Showing posts with label recipes. Show all posts

Kourabiedes - Snowy Greek Christmas Biscuits

Let's celebrate Christmas with Greek crunchy snowball biscuits!

Kourabiedes are traditional Greek Christmas shortbread-like biscuits with crunchy almonds inside covered in icing sugar creating a perfect wintery 'snowball' effect. Be careful not to sneeze when eating them as you will create a snowstorm!

Kourabiedes are extremely popular in Greece during the festive season and can be found alongside other Christmas delights such as Melomakarona - click here for my recipe

Every Christmas, my mother and I bake delicious Greek Christmas treats together and Kourabiedes is a family favourite. Christmas would not be the same without a platter full of these crunchy snowball biscuits. They are very different to other Greek sweets as they are dry and not syrupy like most traditional biscuits and cakes, but fear not - they are just as scrumptious!

So as Christmas is nearly upon us, I dusted off our family's Greek cookbook and used it as a basis for my Kourabiedes recipe which is really easy to make and is a perfect sweet treat to share with family and friends. We have been using this cookbook for three generations in our family and although the pages are falling apart, it is honestly the best Greek cookbook I have come across.


Here is my recipe for Kourabiedes (makes 25 biscuits):

Ingredients

50g Caster sugar

250g Unsalted butter

200g Roasted whole almonds or almond flakes (I explain how to roast them below if needed)

2 Egg yolks

1/4 Cup of brandy/ cognac (Be generous - it's Christmas!)

1/4 Teaspoon nutmeg

240g Plain flour

200g Icing sugar

Instructions

1. I only had almond flakes, so I roasted these in the oven for 6 minutes (make sure they don't burn as they will taste bitter) and then I crushed them with my hands into small pieces. I would recommend you use ready roasted whole almonds and crush them with a rolling pin in order to get that delicious crunchy bite, however almond flakes work just as well if you don't have whole almonds in the house (or are lazy like me)!


2. Preheat oven to 160 degrees. In a large mixing bowl, beat together the butter, egg yolks and sugar.


3. Add the cognac/ brandy, nutmeg and almonds to the mixing bowl.

4. Add the flour slowly, mixing all the ingredients together. The dough shouldn't be very sticky, so add some more flour if it is sticking to your fingers or add water if it is too stiff.


5. Add a sprinkle of flour to a surface area and knead the dough for a couple of minutes.


6. Place baking paper over a baking tray. Tear off walnut size pieces of dough and roll into balls or moon shape crescents and place on the baking tray (just like my photo below).


7. Bake the biscuits for 30 minutes. Ensure they don't burn, they should be a light golden colour when they come out of the oven. Allow them to cool for 5 minutes before moving them anywhere.


8. Pour the icing sugar in a bowl, take each biscuit and roll gently in the sugar and then sprinkle a generous amount of sugar on top.


9. Stack all your Kourabiedes on a plate and enjoy them with family and friends. Kala Xristougenna/ Merry Christmas!


Kali orexi - enjoy!!

0

Melomakarona - Traditional Greek Christmas Biscuits


Melomakarona - the ultimate Greek Christmas biscuit dipped in honey with walnuts sprinkled on top!

When I think of Christmas, I have this wonderful memory of my mother and I, spending days upon days in the kitchen, baking Melomakarona. They sum up Christmas in one bite!

Every household in Greece will either bake Melomakarona or buy them from the local bakery to serve to guests during the festive period. I have fond memories of going to family and friend's houses in Athens eating all of their delicious Christmas sweets. Melomakarona isn't the only popular Greek biscuit during this festive period, two other favourites are Kourabiedes (shortbread style biscuits) and Diples (fried dough drizzled in honey).


During the years, I have experimented with various recipes for Melomakarona, as the key step is to get the syrup quantity just right. You don't want to soak them for too long as they then will become too syrupy, however a dry biscuit just isn't a Melomakarona so you need to soak them for just the right amount of time to get that that crisp outer edge but soft syrupy middle. Some people allow the biscuits to cool down before dunking in syrup but I recommend doing it when they have just come out of the oven and are still warm. My golden rule of a 4 second dunk in the syrup seems to have nailed the ultimate Greek Melomakarona texture!

I have based my recipe on my favourite Greek chef's version of Melomakarona - Argiro Barbarigou but added in my own twists. Another great thing about these biscuits is that they are dairy-free, however be warned, they are highly addictive!

Here is my recipe for Melomakarona (makes 50 biscuits):

Ingredients

For the biscuits:

240g Olive oil

240g Sunflower oil

50ml Brandy

160ml Orange juice

850g Plain flour

2tsps Baking powder

1tsp Baking soda

200g White sugar

1tsp Clove powder

2tsps Cinnamon

Grated peel of 2 oranges (not waxed)

Chopped/ crushed walnuts for sprinkling on top (a large handful of walnut halves)

For the honey-syrup

400g White sugar

400g Greek honey (I used honey from Samos island in Greece)

400g Water

1/2 Lemon (not waxed)

Instructions

1. Preheat the over at 160 degrees. In a large bowl, mix the olive oil, sunflower oil, brandy, sugar, cinnamon, clove powder and grated orange peel.

2. Pour the orange juice into a measuring jug and mix in the baking soda. It will immediately start to fizz. Pour it into the oil mixture and whisk.


3. In a separate bowl combine the flour and baking powder. Pour this into the oil mixture and mix all together with a whisk or your hands. The key is to not mix the dough too much.


4. Take walnut size pieces of dough and roll into small oval shaped balls to form biscuits. Place them on a baking tray covered in baking paper. Allow a little space between each biscuit as they will rise a bit. Using a fork pinch the top (just like the photo below), this will allow the syrup to seep in later. 


5. Bake for 30min, until they turn a nice golden colour. You may have to do two batches depending on how big your oven is.


6. Whilst the biscuits are cooking, prepare the syrup. Add all of the syrup ingredients into a saucepan and bring to boil for 3-4 minutes.

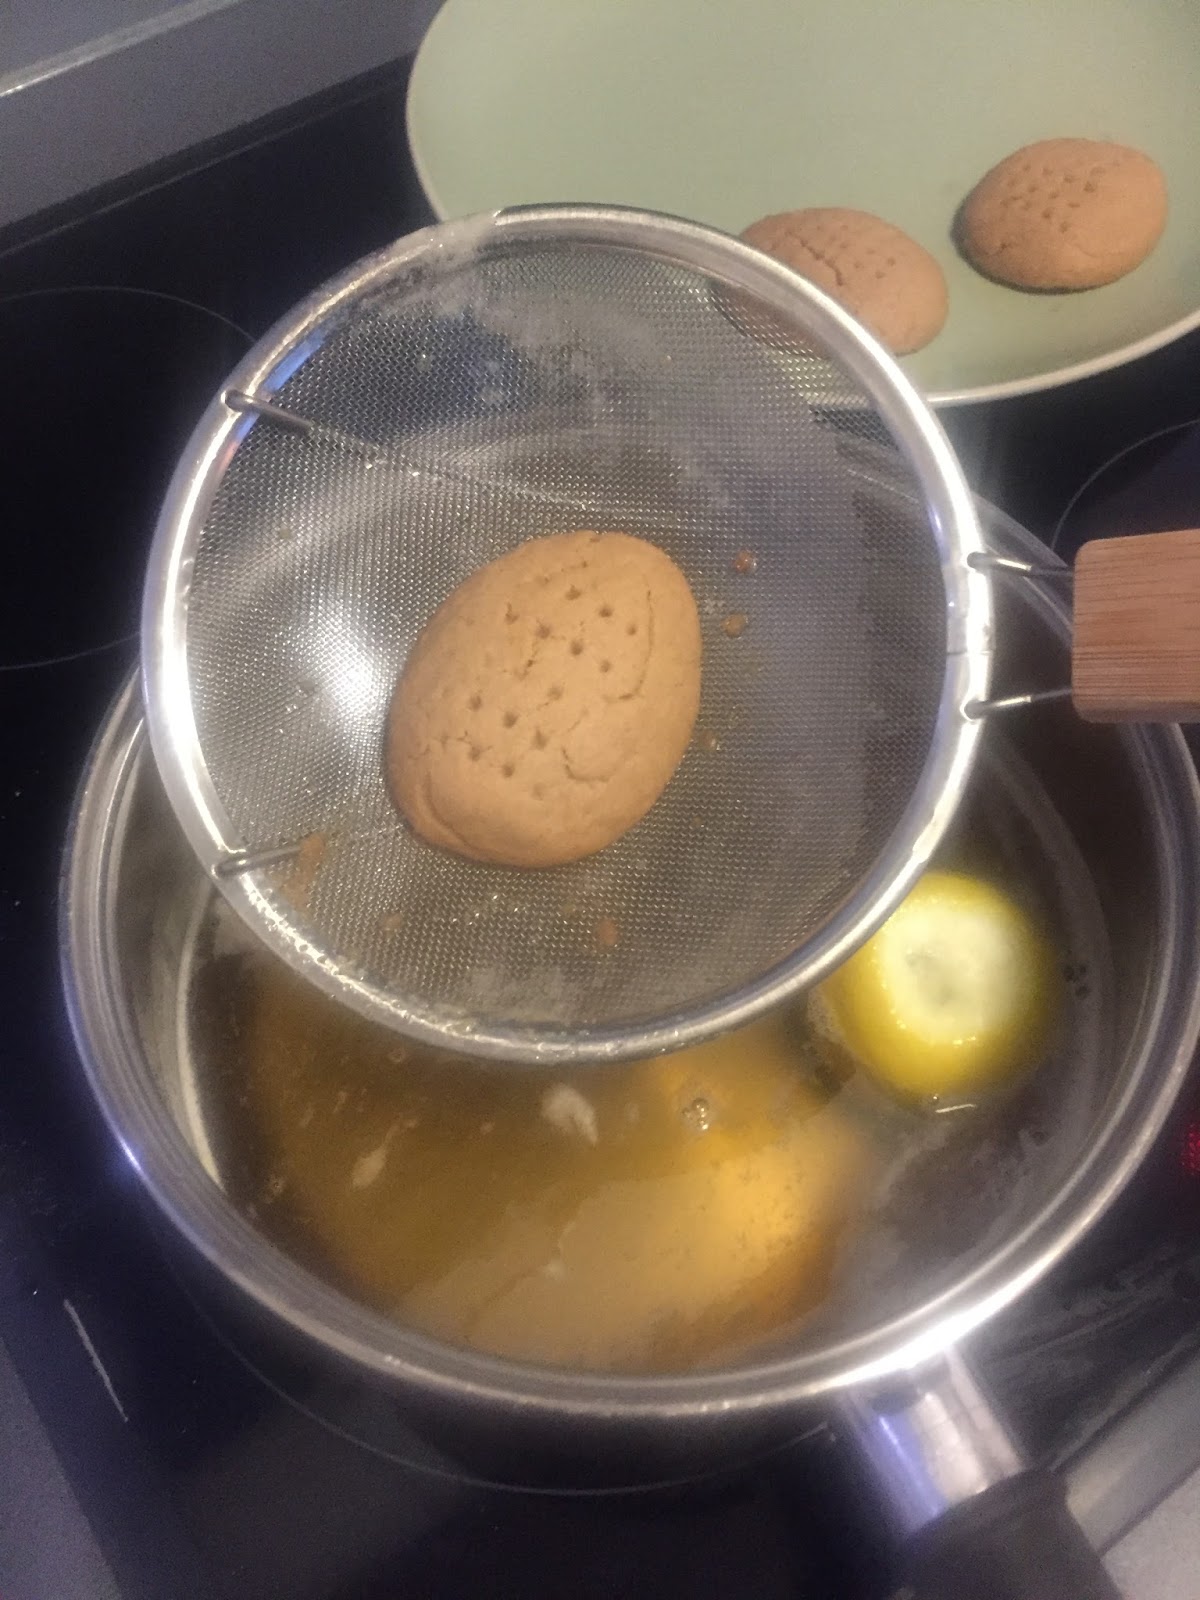
7. When the biscuits are ready, take them out of the oven and place them to one side. The soaking of the biscuits is the most crucial element. I usually use a slotted spoon (a serving spoon with holes in it) but you can use something similar to dunk the biscuits into the syrup.


8. The best way to get the biscuits to absorb the right amount of syrup is to dunk them whilst they are still hot. Carefully dunk each biscuit, one at a time, into the syrup for 4 seconds (ensure they are full submerged into the syrup) and then place on a clean plate. 

9. Once all biscuits have been dunked, crumble some chopped/ crushed walnuts on top. 


10. When all the biscuits have cooled down, you can stack them on top of each other like the picture below. Store them at room temperature (never in the fridge) in an airtight container or simply put some clingfilm over the plate - they will last for the festive period.


Kala Xristougenna - Merry Christmas!!

Kali orexi - enjoy!!


0

Gemista - Greek stuffed tomatoes and peppers


Gemista - Greek stuffed tomatoes and peppers

This is probably one of the most traditional recipes you can find in Greece. Gemista means 'filled' and these tomatoes and peppers are stuffed with the most delicious filling. You can make vegetarian or meat versions of this dish, both are equally as nice and every family has their own little twist to the recipe.

You can be as creative as you want with your filling, however I have kept it traditional and used minced lamb with rice and herbs, however both minced pork and beef go well too.

Gemista is part of the group of Greek recipes called 'Ladera' which means 'oily' and they are usually cooked with a large helping of Greek extra virgin olive oil. They are so tasty and soft when cooked and are usually served with potatoes (cooked in the same baking tray) and some feta cheese on the side. Greeks love their feta cheese and so do I!

Most tavernas in Greece will serve this dish and it is a great recipe to eat during the summer months when there is an abundance of fresh beef tomatoes growing everywhere. It can be quite hard to find large tomatoes in England, however I found mine on Ocado and after letting them ripen for a few days, they came out perfectly.


Here is my recipe for Gemista stuffed with lamb and rice (serves 2/3 people):

Ingredients

2 Beef tomatoes

2 Green peppers

2 Large baking potatoes

Pinch of sugar

5 tbsp Chopped dill

3 tbsp Chopped parsley

4  tbsp of extra virgin Greek olive oil, extra for drizzling

1  Onion finely chopped

2 Garlic cloves finely chopped

200g Minced lamb  

1 tsp Ground cinnamon

2 tbsp Tomato puree

50g Long grain rice

100ml Chicken stock

Instructions

1. Heat the oven to 180C. Slice the top of the tomatoes and peppers  off and place to one side (you will need these later). Using a teaspoon, scoop out the inside pulp of the tomatoes (make sure you do not pierce the skin) and place in a bowl. Blitz the pulp using a hand held blender. Remove the inside of the peppers and dispose of their interior. Sprinkle the inside of the tomatoes with a bit of sugar and place them to one side.


2. Heat two tablespoons of olive oil in a large  frypan, add the garlic and onion and cook until soft. Add lamb, cinnamon, tomato puree to the frypan and cook until the meat is brown.

3. Add the bowl of  tomato pulp, rice and chicken stock to the frypan and mix. Add the chopped parsley and dill & season generously. Cool until the juices are absorbed and the rice is soft (usually takes 15-20 minutes). 

4. Whilst the rice is  cooking, chop the potatoes into long moon shapes (like the picture below). Place them in the baking tray and drizzle with a generous helping of  olive oil. These need to go into the oven 10 minutes before the stuffed vegetables.


5. Once the filling is cooked, stuff the tomatoes and peppers with the mixture, put their lids back on (hopefully you haven't forgotten which lids goes on which vegetable!) and place them in the baking tray with the potatoes. 


6. Turn the potatoes over, drizzle the stuffed vegetables with 2 tablespoons of olive oil (add some more if necessary - the more the better) and  add 3 tablespoons of water to the baking tray. Bake for 35 mins. Serve with a side of Greek salad and feta cheese!


Kali orexi - enjoy!!


0

Fakes - warming lentil soup


Looking for inspiration for a weekday lunch that you can make on the weekend and eat throughout the week that is super healthy?

Fakes is your answer!

When I was younger, my mother would chase me around the house trying to get me to eat my weekly bowl of lentil soup (fakes soupa). Now I'd chase her across the world to have her soup on a weekly basis. So obviously, when I finally got my hands on her recipe, I just had to share it with you all as it is delicious and great for batch cooking.

I am constantly trying to think of inspirational healthy lunches that I can make on the weekend and then take in to work for the week, this recipe is the winner!

The main ingredient in fakes is lentils which are famous for their nutritional benefits. They are a great source of protein for vegetarians and are high in fiber, vitamins, iron and minerals. Lentils can help reduce the risk of heart disease, reduce cholesterol and increase your energy - just what you need during these cold winter months.

Fakes is a family favourite in Greece and is a great way to promote healthy eating for all. My recipe below makes four servings. Fakes goes perfectly with feta cheese crumbled on top and some warm crusty bread on the side.

Ingredients

1 1/2 cups dry brown lentils

4 cups water

1 finely chopped onion

2 finely chopped carrots

2 finely chopped celery stalks

1 crushed garlic

2 tablespoons olive oil

1 vegetarian stock cube

1 tablespoon tomato paste

2 bay leaves

1 teaspoon oregano

Chopped parsley for garnish

Half pack of Feta cheese (crumbled)

Red wine vinegar to taste


Instructions

1. Boil the lentils for 5 minutes and then drain and set aside

2. In a large saucepan, add the olive oil and brown the onion and garlic, then add the chopped carrot, celery and stir

3. Add the fakes, add 4 cups of water and 1 tablespoon tomato paste


4. Crumble the stock cube into the soup

5. Add bay leaves and oregano, stir all together and leave to simmer for 1 hour (you may need to add some more water depending on how thick/ watery you want the soup to be)


6. Once cooked, serve into bowls, stir in some vinegar to taste (I usually add 1 tablespoon per bowl), sprinkle some feta on top, add some parsley for garnish


Kali orexi - enjoy!!


0

Pasteli – sesame seed & nut energy bars


Your very own Greek energy bar!

These days everyone is extremely focused on health and fitness and what the next new diet fad is. I am a huge advocate of healthy eating and I believe that a healthy lifestyle leads to a happy lifestyle. I am also a great believer that a simple fresh diet similar to what our ancestors used to eat is a good guide to follow. Processed food didn’t exist back then and people didn’t use food colourings. It was just pure, simple home cooked dishes with fresh ingredients. You knew exactly what was entering your body!

I want to share with you all one of my favourite ancient Greek recipes that is a great alternative to sweets and chocolate bars. All the ingredients that go in to these sesame seed and nut bars are 100% natural and good for you.

Pasteli has 3 main natural ingredients: honey, nuts and sesame seeds. The ancient Greeks used to eat Pasteli as a dessert, however they have now become so popular in Greece that they are eaten as a snack at any time of the day. They are full of energy and an excellent snack pre and post exercise.

There are two different types of Pasteli, one that is very hard to bite into and the other that is soft and sticky. You can choose which type you want to make by changing your ratio of honey and sesame seeds. The more sesame seeds, the more solid the bar, the more honey, the softer the bar. 

When I make Pasteli I usually try to go somewhere in the middle so that I firstly don’t lose a tooth when biting into it and secondly don’t have sticky fingers...

My recipe will make 24 small rectangular pieces of Pasteli: 

Ingredients

200 grams sesame seeds (Purchased from Carpo - Greek coffee and chocolate shop in Knightsbridge)

120ml honey (I used fresh Greek honey from Samos Island)


100 grams of chopped nuts (I used almonds for this recipe but pistachios are a great alternative)


1 tablespoon olive oil

Instructions

1. In a frying pan, toast the sesame seeds and the nuts over medium heat for 10-15 minutes. Make sure the sesame seeds do not turn brown


2. Put the honey in the saucepan and heat until it starts to boil

3. Immediately lower the heat and after 5 minutes add in the sesame seeds and nuts

4. Stir the mixture so that the honey covers all of the sesame seeds and nuts

5. Line a baking tray with baking paper and pour the mixture from the sauce pan onto the baking tray
 

Shaping the Pasteli

1. Use a spatula to flatten out the mixture to an even level on the baking tray. It doesn't need to cover the whole tray and the mixture should be about half a cm thick


2. Use a large sharp knife to tidy and straighten the edges 

3. Put the baking tray in the fridge for 30 minutes to cool down

4. Remove from the fridge and cut the Pasteli into small bars like in the photo below


5. Wrap each individual bar in cling film so that they don't stick together


I suggest keeping  the Pasteli in the fridge as this will keep each bar fresh and solid.

Kali orexi - enjoy!!

3

Spanakopita - Spinach and Feta Cheese pie

Planning a dinner party this weekend...Spanakopita is your answer!

This is probably one of my favourite recipes of all time. Like all Greeks, I grew up eating Spanakopita. It is a delicious mix of spinach and feta cheese wrapped in crisp filo pastry.

You can buy Spanakopita everywhere in Greece, all bakery's sell it and you will often see Greek people grabbing one to go for breakfast or as a snack. However, nothing beats a homemade dish and my mother's recipe is the best!

Spanakopita literally means spinach (spanaki) pie (pita) and in Greece you can get lots of different types of pitas…Spanakopita (spinach pie), Tiropita (feta cheese pie), Kotopita (chicken pie), Kolokithopita (courgette pie)...notice how they all end in pita, pie! And they are all so tasty! 

Spanakopita has been around for generations and everyone has their own little twist to the recipe. To be truly authentic you should really make your own filo pastry and whilst this can be highly therapeutic, it is just so much easier to buy it from the supermarket and it tastes just as good if I am being honest!

You can make spanakopitakia (confusing huh!?), which basically means small spanakopita which are usually in triangular or half moon shapes…


However, I like to make my spanakopita in a large baking dish, keeping it very traditional. It can either be served as a main dish or cut into smaller pieces and eaten as a snack or as part of meze (Greek starters, similar to Spanish tapas).


My recipe below serves 6-8 people. It is a great vegetarian dish that I usually either serve alongside a meat dish or serve with a large Greek salad and a dollop of tzatziki on the side. Spanakopita should ideally be eaten the same day you make it as the phyllo pastry becomes less crisp the second day, but if you warm it up in the oven (never in the microwave as it gets soggy), it tastes just as good!

Ingredients

500g filo pastry

1kg fresh spinach

2 large leeks

500g feta cheese

60g rice

30g butter

2-3 tablespoons of fresh dill

1 tablespoon dried parsley

2 medium onions

2 eggs

olive oil

salt and pepper to taste

Instructions

1. Wash the spinach and add to a saucepan of boiling water for 3-5 min. Drain, squeeze out all the water and set aside (if you don't have a big saucepan you may need to do a few batches as there is a lot of spinach - Popeye would be in heaven!)

2. Finely chop the leeks and onion. Saute both in a large fry pan with a tablespoon of oil until soft and brown

3. Boil rice for approx. 10 min until soft, drain any remaining water and set aside

4. Add the spinach, chopped dill and parsley to the onions and leeks and stir 


5. Whisk two eggs in a bowl, add to the fry pan and mix in with the rest of the ingredients, season with salt and pepper

6. Crumble the feta cheese into small pieces and mix it in with the mixture above (delicious)


7. Melt the butter in a cup in the microwave and add 3 tablespoons of olive oil

8. Grease a large baking tray with the olive oil and butter mixture


Now the fun bit begins:

9. Line the baking tray with 1 packet of filo pastry. Brush each sheet separately with the butter and olive oil mixture using a pastry brush, just like my picture below


10. Make sure the pastry is hanging over the edges so that you can fold it over to make a crisp golden crust

11. Add the mixture from the saucepan as the filling and spread out evenly over the pastry in the baking tray


12. Use the filo pastry from the second pack to cover the filling, ensuring the edges are hanging over the baking try as before. Don't forget to brush each sheet separately with the butter and olive oil mixture (you may need to add a tad more olive oil if you are running low)

13. Fold the sides back over into the tray to create that crispy crust around the edge of the tray and brush with the butter and olive oil so that it turns a gorgeous golden colour when baked


14. Bake in the oven at 180 degrees for 45 mins or until golden brown

15. Let it cool slightly before serving


Kali orexi - enjoy!!

1

Strapatsada – Greek scrambled eggs with fresh tomatoes


This Greek recipe is a brunch favourite in our household. Can a weekend start without brunch or more importantly eggs…?


No, I didn’t think so!


Strapatsada is absolutely delicious but looks rather less appealing, so I apologise in advance for my photos. However, do not be put off, it is scrumptious and extremely nutritious.


Saturday mornings always start with a Greek coffee in bed, pilates and then brunch. This is a classic brunch dish, super easy to make and ideal if you are having a group of friends round and need to whip something up quickly.


Earlier in the week I went to one of my favourite café/ deli's on Marylebone high street called Natural Kitchen and picked up some large free-range eggs for this recipe.


In Greece this dish is usually eaten in the summer when there is an abundance of fresh tomatoes and as it is so quick to make, it is eaten as a light lunch or a snack. It originates from the parts of Greece closest to Italy – the western Peloponnese and the Ionian, however it can now be found all over Greece.


Here is my easy recipe for Strapatsada which you can whip up in 20 minutes – have a great weekend!


Ingredients


Half a red onion finely chopped 

1 tablespoon of olive oil 

4 eggs 

4 medium tomatoes grated finely (you can use chopped tinned tomatoes but I prefer fresh ingredients) 

Half a packet of feta (chopped up) 

Half a teaspoon of paprika

Half a teaspoon of dried oregano (I buy mine in Greece) 

Pepper to taste

Let’s cook:

1. Wash the tomatoes and grate them in a bowl, dispose of the skin and set to one side


2. Heat the oil in a non-stick saucepan 

3. Sauté the onion until it softens and then add the grated tomato

4. Keep mixing it until all the juices have evaporated and it become a dense sauce

5. Add pepper, dried oregano and paprika


6. Crack the eggs into the mixture and keep mixing until the eggs are cooked

7. Crumble the feta in, mix and serve


Strapatsada goes great with avocado and fresh spinach on the side


Kali orexi – enjoy!!

1